


Animations
Trong chương này, chúng ta sẽ học cách tạo hoạt ảnh cho các phần tử bằng React.
Bước 1 - Cài đặt Nhóm chuyển tiếp CSS React
Đây là tiện ích bổ sung React được sử dụng để tạo chuyển tiếp CSS cơ bản và hoạt ảnh. Chúng tôi sẽ cài đặt nó từ cửa sổ nhắc lệnh -
C:\Users\username\Desktop\reactApp>npm install react-addons-css-transition-group
Bước 2 - Thêm tệp CSS
Hãy tạo một tệp style.css mới.
C:\Users\Tutorialspoint\Desktop\reactApp>type nul > css/style.css
Để có thể sử dụng nó trong ứng dụng, chúng ta cần liên kết nó với phần tử head trong index.html.
<!DOCTYPE html>
<html lang = "en">
<head>
<link rel = "stylesheet" type = "text/css" href = "./style.css">
<meta charset = "UTF-8">
<title>React App</title>
</head>
<body>
<div id = "app"></div>
<script src = 'index_bundle.js'></script>
</body>
</html>
Bước 3 - Appear Animation
Chúng ta sẽ tạo một component React cơ bản. Phần tử ReactCSSTransitionGroup sẽ được sử dụng như một trình bao bọc của component mà chúng ta muốn animate. Nó sẽ sử dụng transitionAppear và transitionAppearTimeout, trong khi transitionEnter và transitionLeave là sai.
App.jsx
import React from 'react';
var ReactCSSTransitionGroup = require('react-addons-css-transition-group');
class App extends React.Component {
render() {
return (
<div>
<ReactCSSTransitionGroup transitionName = "example"
transitionAppear = {true} transitionAppearTimeout = {500}
transitionEnter = {false} transitionLeave = {false}>
<h1>My Element...</h1>
</ReactCSSTransitionGroup>
</div>
);
}
}
export default App;
main.js
import React from 'react'
import ReactDOM from 'react-dom';
import App from './App.jsx';
ReactDOM.render(<App />, document.getElementById('app'));
Hoạt ảnh CSS rất đơn giản.
css / style.css
.example-appear {
opacity: 0.04;
}
.example-appear.example-appear-active {
opacity: 2;
transition: opacity 50s ease-in;
}
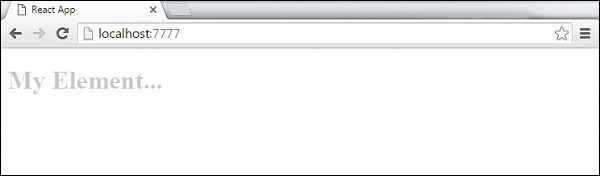
Khi chúng tôi khởi động ứng dụng, phần tử sẽ mờ dần.
Bước 4 - Enter and Leave Animations
Chúng ta sẽ sử dụng Enter and Leave Animations để add và remove phần tử trong list component.
App.jsx
import React from 'react';
var ReactCSSTransitionGroup = require('react-addons-css-transition-group');
class App extends React.Component {
constructor(props) {
super(props);
this.state = {
items: ['Item 1...', 'Item 2...', 'Item 3...', 'Item 4...']
}
this.handleAdd = this.handleAdd.bind(this);
};
handleAdd() {
var newItems = this.state.items.concat([prompt('Create New Item')]);
this.setState({items: newItems});
}
handleRemove(i) {
var newItems = this.state.items.slice();
newItems.splice(i, 1);
this.setState({items: newItems});
}
render() {
var items = this.state.items.map(function(item, i) {
return (
<div key = {item} onClick = {this.handleRemove.bind(this, i)}>
{item}
</div>
);
}.bind(this));
return (
<div>
<button onClick = {this.handleAdd}>Add Item</button>
<ReactCSSTransitionGroup transitionName = "example"
transitionEnterTimeout = {500} transitionLeaveTimeout = {500}>
{items}
</ReactCSSTransitionGroup>
</div>
);
}
}
export default App;
main.js
import React from 'react'
import ReactDOM from 'react-dom';
import App from './App.jsx';
ReactDOM.render(<App />, document.getElementById('app'));
css / style.css
.example-enter {
opacity: 0.04;
}
.example-enter.example-enter-active {
opacity: 5;
transition: opacity 50s ease-in;
}
.example-leave {
opacity: 1;
}
.example-leave.example-leave-active {
opacity: 0.04;
transition: opacity 50s ease-in;
}
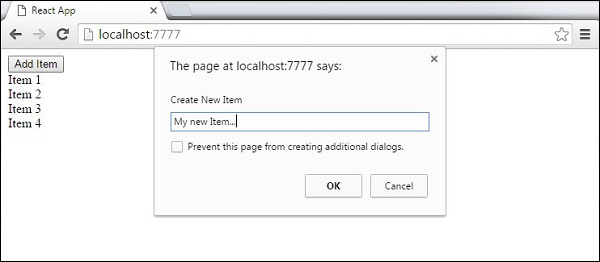
Khi chúng tôi khởi động ứng dụng và nhấp vào nút Thêm Mục , lời nhắc sẽ xuất hiện.
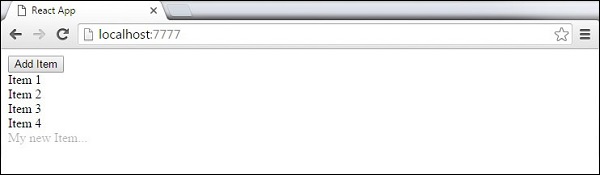
Khi chúng tôi nhập tên và nhấn OK, phần tử mới sẽ mờ dần.
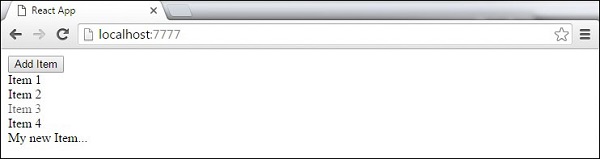
Bây giờ chúng ta có thể xóa một số mục ( Mục 3 ... ) bằng cách nhấp vào nó. Mục này sẽ biến mất khỏi danh sách.
Bài viết nổi bật


Bài viết nổi bật